
There’s something special about a wood cabin. Maybe it’s the warmth of the grain, or the way it blends into the woods like it’s always been there. But that natural charm won’t last forever unless you take care of it. One of the most important things you can do is seal and stain the wood properly. It sounds simple, but doing it right takes a bit of know-how and a fair bit of patience.
Start by really looking at your cabin’s exterior. Over time, the wood will pick up all sorts of stuff—dust, pollen, mold, and who knows what else. If it’s already been sealed or stained before, there might be some old finish flaking off too. Don’t just brush off the surface and call it good. The wood needs to be properly cleaned so that any new stain or sealant can actually soak in. A pressure washer is great if you have one, but it’s not absolutely necessary. What you need is water, a mild cleaner, and a good, stiff-bristled brush. Work the solution into the grain, scrub away the grime, and rinse it off. Let it dry—completely. That usually means waiting at least 48 hours, but more if the weather’s humid or cool.
Once the wood is dry, it’s time to prep it. This part might feel like a chore, but it’s worth the effort. Look for areas where the wood is rough or splintered. A little sanding here and there goes a long way. You’re not trying to make it furniture-smooth—just enough to help the stain soak in evenly. If some parts of the wood are darker or lighter than others, using a wood brightener can help even it all out. This stuff isn’t just for looks—it actually helps the wood absorb the stain better.
Now you’ve got a clean, dry surface ready to go. Choosing the right stain is where you get to make it your own. There are three main types—transparent, semi-transparent, and solid. Transparent stains show off the wood grain the most, but they don’t last as long and may need reapplication every year or two. Solid stains last longer and give stronger color, but they cover up the grain. Semi-transparent is somewhere in the middle. You’ll still see some grain, but you get better durability. Think about where your cabin sits—is it in full sun most of the day? That might push you toward a solid or semi-transparent option. If it’s mostly shaded, a transparent stain could work just fine.
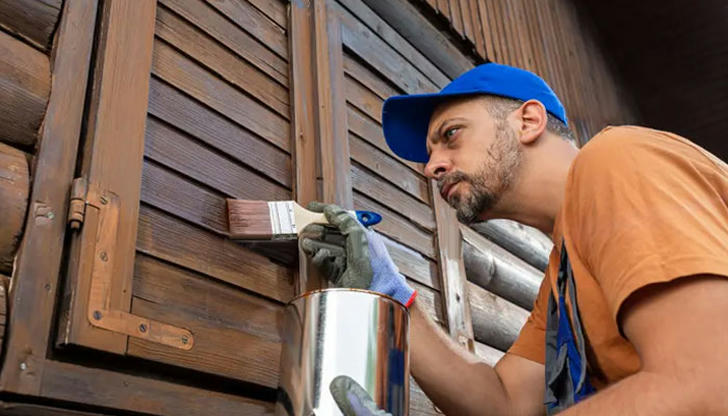
Before you apply anything, stir your stain well. Don’t shake it—shaking creates bubbles, and bubbles make for a bumpy finish. Use a clean brush or roller to apply the stain. You can use a sprayer too, but you’ll probably still need to go over it with a brush to work the stain into the wood. Start at one side of the cabin and work in small, manageable sections. Always follow the grain of the wood. Don’t be tempted to rush. If the stain sits on top too long without being brushed in, it can get sticky or uneven.
One coat might be enough, but that depends on the wood and the stain. Some areas might soak it up like a sponge, while others don’t need much at all. Always read the product’s instructions. If a second coat is needed, let the first one dry thoroughly before going back in.
Next comes the sealant. Some stains already include sealing properties, so double-check your product before applying a separate sealant. If yours doesn’t, or if you want extra protection, a good clear water-repellent sealer is the way to go. Like with stain, apply it in small sections with a brush or sprayer. This part isn’t flashy, but it makes a huge difference. It helps your cabin stand up to rain, snow, sun, and even bugs.
Let everything dry. That can take a day or two, maybe more if the weather isn’t cooperating. Don’t rush it. Walk away and give the wood the time it needs to absorb and cure. When you come back, you’ll see the difference. The color will be richer, the wood will feel smoother, and you’ll know it’s better protected.
Taking care of a cabin doesn’t end after one sealing job. Wood is always moving—expanding, shrinking, reacting to the weather. That’s why it’s smart to check your cabin once a year. Look for signs of wear—fading, dryness, peeling. If the wood looks a little tired, that doesn’t always mean you need to redo everything. Sometimes just hitting the sunny side with a fresh coat of stain is all it takes.
Pay attention to the details too. Door frames, window trims, the bottom edges near the foundation—these spots tend to get missed but take the most beating. Water splashes, snow piles up, insects crawl in. Give those areas a little extra love when you’re doing your maintenance. They’ll last longer, and your whole cabin will look better for it.
And here’s the thing—not every job has to be perfect. You’re not trying to win a contest. A few brush marks or slightly uneven patches are just part of the character. What matters more is consistency, good prep work, and keeping up with it. The more you care for your cabin, the more it gives back. You’ll notice it in how it holds up through storms, how the wood stays strong year after year, and how good it feels every time you pull into the driveway and see that rich, warm color greeting you.
In the end, sealing and staining a cabin is a lot like taking care of anything you care about. It’s not hard, but it does take time. Do it once, do it well, and your cabin’s going to thank you in the long run.

